Wednesday, June 19, 2013

Oh my boys are going to kill me!

I made this layout using LIP sets from Peppermint Creative.  Life in Pictures (also referred to as Project Life) seems to be the way to go.  I love that you can put a page together so quickly.   And the kits don't have to be limited just to layouts.  You can go hybrid and make note cards, thank you cards, fridge magnets, etc. 

The following sets were used on my layout. 
LIP KIT: Funktography Edition 3x4" Journal & Filler Cards,  LIP KIT: Funktography Edition Jazzers & Life in Pictures: Prompt Card Templates - Family.  I also used the  
Letterboard Alphabet - Brown (this set is free with just a purchase of 1.00)

LIP KIT: Funktography Edition 3x4" Journal & Filler CardsLIP KIT: Funktography Edition JazzersLife in Pictures: Prompt Card Templates - Family

Letterboard Alphabet - Brown

 
I used the brackets from this set.  I put one at the beginning of the page and one at the end of the page.  At first my friend didn't like it and then I explained that everything within the brackets is the story I'm telling.  She liked it then.  Thought about taking them out, but I kinda like them.

Don't forget these Brown Letterboard alphabet can be yours for FREE.  With just a $1 purchase.  You can beat that. 
And right now there is a couple of other free things.  One at Peppermint Creative and another on Facebook.  They go together...so co check it out.


Here is my page:  The boys are going to be upset I used them....but I will call it payback for all the times they don't listen to me.
 

Thanks for stopping by!!  I hope you enjoyed my page!!!!  Please feel free to leave comments!  I love to read what everyone has to say.  This is one of my first pages in quite some time.  Like I said, I thought it was fun, but I'm sure they wouldn't agree~

Don't forget to go to www.peppermintcreative to check out all the other kits that Miss Mint has been working on.  She rocks.  There are lots of new LIP kits and of course this freebie below.

This is the amazing free kit!  I love it. You can check out the Gallery to see some really great layouts and hybrid pages.
 

Tuesday, June 18, 2013

Welcome to our neighborhood.....

This week's project for The Cutting Cafe' I'm using the Welcome Home printable stamp set.  The timing couldn't be more perfect because two families have just moved in around our block in the last few days.  Time to get to baking my yummy banana bread.  I'm going to put into a sack and attach the cute tag that I made with this set to it. 
 

The Welcome Home printable set includes 55 images!!!


Welcome home 2
 
 
Here are a few more stamps in the set 

Welcome home

Welcome home 3

Here is the tag that I made to put on my banana bread

I used washi tape for the first time.  I have about 10 rolls but have never used it before.  It's the green with white polka dots.  It's also VERY easy to use.   I also used my silhouette cameo to cut the images out.  Part of it I just used a pair of scissors to cut it out. 
 
This set is so versatile!  Welcome Home, Welcome to the neighborhood, New Home, SOLD, etc.  So many possibilities.  Maybe one day I can use this set for "We've Moved". 
 
 
Now I better get to baking that banana bread. 
....And don't forget to go and check out the rest of the projects from The Cutting Cafe's Design Team.  This team is such a great group of very talented ladies.
Win free sets by simply leaving a comment on The Cutting Cafe's Blog.
 

Thursday, June 13, 2013

Silhouette Welding Tutorial

Hello everyone!  I hope that everyone is having a great day.  It's one day closer to Friday and that makes me happy.

I made this card for my Godchild to congratulate him on a job well done in school.  My husband said "You made it, but you probably won't get it to him until school starts again."  He knows me well.  My intentions are good.  Anyway, I proved him wrong!  I made it and mailed it along with my niece's card the next day!!  Wooohooo.....there is a first for everything and that was definitely a first.

Some of my silhouette/facebook group friends ask me how I made the card.  I'm pretty new to writing tutorials, so I hope I didn't miss anything.  I've written a few for Peppermint Creative (you can see them here and here).  The more you write, the better you get....so here it goes!!


You Rock!!!


First I opened a star that I bought at the Silhouette online store.  I'm sure there are plenty of free, but I needed this one pretty quick.  I used it to make this project for my friend, It was her Dad's 70th birthday.  It was also my first project. 


Next thing you will do is open this image on a new page. You can probably do it all on the same page and move images that you aren't currently using off to the side.  However, I like to open a new page. 
 
This is what it looks like (above) when you open it.
This was a free image I got here


Next step is to pick Select Trace area (top red arrow).  You will drag the square to cover the entire image until it is all highlighted.  Once that is done, you will UN check (sure there is better terminology)  the High Pass Filter (second red arrow).  After un checking the high pass filter, go to the threshold and slide it all the way to the right or until the entire image highlighted yellow.


 After highlighting it all you will select the trace outer edge option.  You can see the red lines around the image.  It should look like the image above. 


After selecting the trace outer edge option, you will drag them apart. At this time you can move the original image off to the side if you like the looks of it (the texture) or delete it.  I deleted the image because I wanted the solid look.


You should end up with an image that looks like this.  Next step is to fill in the color.


Next, make sure that your image is selected.  I have tried doing new steps without making sure the image is select and nothing happens.....of course....then it clicks....I forgot to select it...UGH!  Okay so now it's time to select the paint bucket at the top of your screen.  Once you hit the bucket tool, color options will appear on the right.  Pick black, it will fill your image with the color selected. 


Now you do a copy and paste of the image.  You will have two images on your screen.


The next step is to make sure one image is outlined and one is not.  To do this you will select the scissor tool at the top of the page.  This will pop up the cut menu.  It will show that both images have cut lines, you will want to turn the cut lines to one of them off.  Highlight one of them and then select the NO CUT button.  This should remove the red lines. 

 
 Following so far? 
I know it's a lot of info and some of it very basic, but I trying to think about the ladies that  have never done these steps before. (and/or need step by step instructions like I do!) 
Okay, so let's continue...this was the confusing part for me. 


Okay, here is where it gets tricky.....
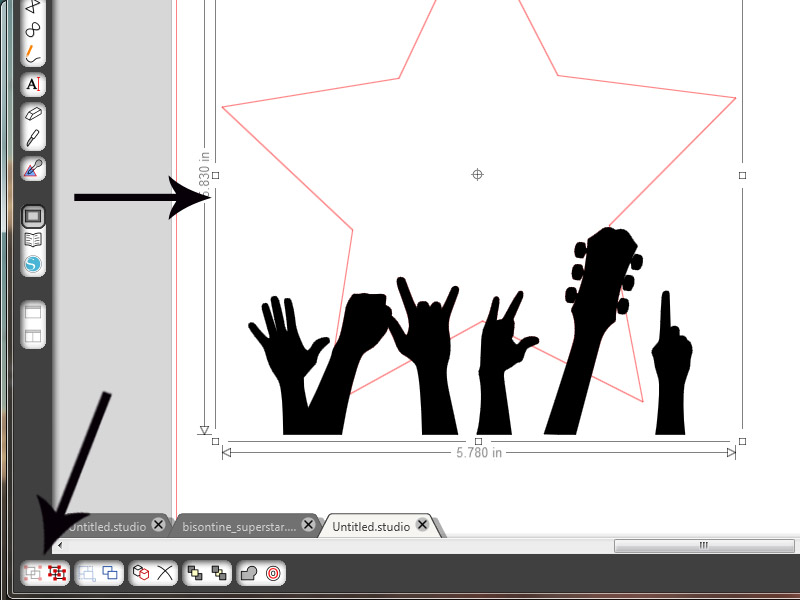
We need to bring both images to the same page.  So just copy and cut the image of your star and paste it to the page where the "hand" images are.
 
1. Move the "no cut" image off to the side.  You will be using at the end so you can just leave it off to the side for now. 
2. You will now highlight the whole hand/guitar image. 
3. Once it's highlighted you need to RELEASE compound path under the modify menu


Now you are going to slide the bottom image up to the star and place it where it looks nice to you.
Highlight the whole image.


Next you need to click on Modify button at the top menu bar.  It will pop up options on the side.  Now hit the subtract button under the modify window.   After clicking on the subtract button, it will look like the picture above.   The pictures are joined and the red are where it is going to cut. 


Now select the whole image (star) and group it together.  The group button is all the way on the bottom left.  This makes it all one piece instead individual pieces and you are able to move it around.
 
 
 Next take the image that was over on the side of your page and line it up with the top image (star) Remember to make sure the cut lines are off on the image you are dragging back up the where they were welded together.


Now that you have it all lined up.  You will select the whole image together and Group them together.  


This would be a good time to check your cut lines to make sure it is done right.  It should look like this image.
 
 
Now after you have accomplished ALL of these steps, you are ready to make the rest of the card.  I used a card base from the Silhouette Store.  The digital paper is from Peppermint Creative. It's listed below.  It's one of my favorite paper packs.  Actually, I have several favorites.
 
Houndstooth Heaven Papers
 
Now you have everything you need to make this card.  I hope that the steps are all there and that you can understand my instructions.  Please feel free to ask me any questions.  I know there may be an easier way to do this.  I discovered a few while making this tutorial. 
 
 
Have a great Day!!!
Tanya


Tuesday, June 11, 2013

Happy Father's Day!........

For this week's project at The Cutting CafĂ©, we got to choose from the following 3 sets.  These sets are perfect for Father's Day. 

SHIRT AND TIE CUTTING FILE / TEMPLATE SHAPED CARDS

These are two of the stamps that come with the set
Shirt and tie circles
Here is a Sneak Peek of the set I used.  Keep reading to see the finished project!
 
 
This set features 98 images plus 14 sentiments in 3 ways!
 
Cars
 
CLASSIC CAR SHAPED CARD SET
These are the sentiments for this set:
CLASSIC CAR

 This is just a sneak peek of what are in the sets to view complete sets or to purchase, stop by The Cutting CafĂ©, you won't be disappointed.


I choose the Shirt and Tie Set.  This set is so much fun and so easy to work with.  My son and I are going to design one that suits my husband (his dad..lol) personality.  He wouldn't wear a tie like this unless one of the boys bought it for him! hmmmmm.  I like argyle and the colors, so I made this one.


Here is a close up of the details
 
Hope you enjoyed my project. 
 
Don't forget to stop by The Cutting CafĂ©'s blog to see the rest of the teams projects and don't forget to leave a comment for a chance to win free sets.  At the store there are so many NEW sets. 


Monday, June 10, 2013

This month's Facebook Silhouette Challenge..........

This is my second time doing the Silhouette Facebook challenge.  I love being a part of this group.  Because of some wonderful ladies on this group, I was encouraged to do a fundraiser for my friend Jessica.  Jessica was part of one of the many families that lost everything to the horrific tornados that went over Carney, OK two weeks ago.  Because of this fundraiser I raised enough to order Jessica a Silhouette Portrait.  If I get more donations, I will get her supplies to go with her handy dandy Portrait.  I can't wait to see the smile on her face.  THANKS LADIES!!!

This months project was done using vinyl again (sorry)  I love vinyl.  I've kept it pretty simple so far.  There are many other things that I want to do with vinyl like layering, HTV (heat transfer vinyl), etc.

Of course I used my Cameo to cut this cute bird cage I bought from the Silhouette store.  I bought this plate from a second hand store.  I don't get to go very often, but this is one of the things I always look for.  I think this plate cost me a quarter.  How awesome is that.  I did get one at a "junk" store the other day and paid $5.00 for it.  I thought that was high, but is an unusual shape.   The plate holder I got at our local craft store for half off.


Supplies used: 
Plate - second hand store
Vinyl - craft store
Transfer tape - Silhouette store
black ribbon- craft store
plate holder - craft store
Not Pictured - glue gun

After cutting the bird house on my cameo I took the excess vinyl off

I then cut around the image and the "weeded" the small pieces out with a tool I purchased from the silhouette store.


After weeding out the excess I then applied the transfer tape and smoothed it out with a Pampered Chef scrapper.  I couldn't find my tool I got from the Silhouette store and I have several of these from stones I bought.  An old credit card will do the same.  I've have tried using contact paper and it just is not the same.  It was a big pain in the rear.  Transfer tape is more expensive but so worth it.  Contact paper just isn't sticky enough for me.  I have heard that it works for others.  I just don't have the patience for it. 


I then positioned on the plate and smoothed it out with the scraper

Remove the transfer paper and VOLIA!
 
I then added my embellishments.  I hot glued the bow on.
 
The pearl is from Stampin' Up! It already has adhesive on it.

I bought the plate stand at my local craft store when it was 50% off.  I'm going to put it in my craft room (if it ever really becomes MY craft room)
 
What's a bird cage without a bird?  I just didn't think about it when I made it, so it's just photoshopped in.   
 
The last two pictures are just me just being silly!........


Make Your Own "Rubber" Stamps by Coley's Corner


This Month's Facebook Silhouette Challenge by Tanya's Creative Space

3D Tea Gift Box Download by Creative Turn

File Cabinet Makeover by Super Sweet Life

Jewelry Box Creation by Joy & Gladness of Heart

Retro Chair Silhouette by Tried & True

Toddler Train T-Shirt by The Thinking Closet


Placecard & Card Medley by An Elegant Touch


Pretty & Personal Birthday Bundle by The House on Hillbrook

Tuesday, June 4, 2013

Hello Everyone!!......

First I just want to say "THANK YOU!" for your prayers and donations.  I was able to get my friend, Jessica a Silhouette Portrait, it's ordered and will be here soon  THANKS AGAIN!!   I will continue to take donations to get her stuff to go with her new machine.  I can't wait to give it to her.  They are still cleaning up as well as many others.  This tornado season has been horrible.  I'm so ready for it do be over and DONE!!!

With all the bad weather I have a lot of time away from my computer.  I've been staying off so lighting won't mess it up or sitting here waiting for sirens to go off  to go into our storm shelter.  So this project is brought to you with BIG smiles because it means a break in the weather. 

Regina from The Cutting CafĂ©  has really been on a roll designing some really great cutting files for our cutting enjoyment.  I really love Regina's style.  You can use a cutting machine (I have a Silhouette ~ love it) or something as simple as a pair of scissors. 

For this weeks project we got to pick from the following sets:
DIAPER SHAPED CARD or BABY BOTTLE TREAT BOX 1 OR 2 OR BABY BOTTLE SHAPED CARD 1 OR 2 cutting file.  I used the Baby Bottle 2 template-cutting file. 


Baby bottle shaped card 2


I used cardstock from Stampin' UP! and my silhouette cameo to cut out this cute baby bottle card.  I embellished with a button and some ribbon I got from Stampin' Up! some time ago.
 
Thanks for stopping by and don't forget to check out everyone's projects that will be posted on The Cutting CafĂ© Blog tomorrow.  Leave a comment there for a chance to win some great sets.


Wednesday, May 29, 2013

Doing an Online Craft Fundraiser to help a friend (victim) of the recent tornadoes

Okay, here it goes. With the encouragement from Lauren and Cindy, two of my friends from the Silhouette Challenge FB group, I have decided to order My friend in Carney that lost EVERYTHING to a tornado the day before the big Moore one, a Silhouette Portrait. She loved scrapbooking, making gifts and cards. I know this is not on her mind right now. But when things calm down, hopefully her love for crafting will return. Soooooo.....
 

Here is the fundraiser...they're are a few of us (so far) that are going to go in and donate money to get her a portrait that is on special by this Friday. If you are interested..I have a donate button that is through paypal. Lauren has tried it and it worked.  woooohoooo!     So what do you say....want to help me make one victim from this devestating tornado enjoy what she loves to do again some day.
Thanks~ This is my first time doing something like this...so please bare with me!!!
Any funds raised over the amount of the portrait will go to a Hobby Lobby or JoAnn's gift card.  I will let everyone know the totals and where it will go.