Showing posts with label digital paper. Show all posts

Monday, February 17, 2014

What a Beautiful Day it is Today!!!

Finally, some warmer weather.  It's been a really cold winter, too cold for me!!  I don't care for the heat either, but today.....today is awesome!  Oh and it's even better because I'm off today for President's Day! 

The next holiday is St. Patrick's Day!  All I really know about St. Patrick's Day is that you have to wear green so that you don't get pinched!   I also know that is was originally started with the Roman Catholic's and that day all food and alcohol consumption is lifted.   I don't know about you, but I can see that being VERY dangerous.  It's probably a good thing, it's not celebrated here like it is in Ireland!!!

 Here is a project to celebrate St. Patty's Day! 

 
This project was made with the Miso Lucky Kit and Chevron and Solid Papers v.01 from Peppermint Creative.  I also did a print and cut with my most favorite tool ever, my Silhouette Cameo!  I don't know what I would do without it!


Here is a close-up of the tag.  I bought the tag from the Silhouette store.  I also did a trace on the shamrock and added pop dots for more dimension.

 
Thanks for stopping by!  Hope everyone has a GREAT week!
Tanya~

Tuesday, October 29, 2013

Happy Halloween!!

I know it's been a while.  Things have been crazy, I'm sure most of you can relate.  I have been doing some creating and wanted to share with you.  I made these cute treat tags and cards with the NEW digital Halloween kit from Peppermint Creative.  I really L O V E the new Funkin Pumpkin set. 

I filled clear cellophane bags with candy and attached the tags I designed with black jute ribbon.  Now how cute are these?  The elements in the kit are so cute.  I couldn't resist making matching cards.

I designed these tags in Silhouette Studio design addition and cut them out with my handy dandy Silhouette Cameo.  

For this tag, I used this really cute spider and the spider web paper for the background.
   
For this tag, I just simply used the Trick or Treat banner and layered it on the diagonal striped paper.


The Funkin Pumpkin set includes:
13 papers, 3 frames, 4 epoxy stickers, 4 flowers, 4 felt shapes, 2 confetti bursts, 1 branch, 2 lace edges, 2 arrros, 1 ribbon, 1 candy corn splatter, 1 scalloped edge, 2 wood signs, 1 flag edge, 1 fence, 1 felt flourish, 1 round frame, 1 pumpkin seed splatter, 2 pumpkins, 1 spider, 2 film frames, 1 string, 1 stick, 24 word art, 2 stickers, 1 alphabet set (a-z, 0-9 !? {} % ").


Below are the two cards that I also designed in the Silhouette Studio Design Edition using the same kit.
 
I made it look like a grave yard of pumpkins and layered one in the center with pop dots.

 
This card is simple, but I love the look of it.  The Trick or Treat banner is also layered with pop dots for dimension.
 
And last, but not least, a little treat box using one of the cutting files from the Silhouette on-line store.
 
 
Used the diagonal striped paper and The little "H is for Halloween" element from the kit.  Finished it off with a black ribbon.
 
Go to the shop and check out all the Halloween sets (and more).  
 
Right now until October 31st, Halloween sets are on sale. 


Funkin Pumpkin Halloween Kit + LIP Bundle
 
Thanks so much for stopping by!

Hope everyone has a save and Happy Halloween!!


Wednesday, June 26, 2013

I hope everyone is having a great summer / offset tutorial

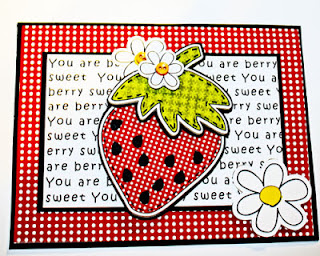
What memories do you have of summer?  Vacation, popsicles, flip flops, swimming pools and of course, for some, picking (and eating) fresh strawberries.  Even though I have attempted many times on my own to grow strawberries and have NOT been successful, I always enjoyed picking them from the neighbors garden.  So when I saw that this weeks theme for The Cutting Cafe' was strawberries, I was very excited. 
 
We had the following three sets to choose from:  STRAWBERRY TREAT BOX or STRAWBERRY SHAPED CARD...TEMPLATE - CUTTING FILE or BERRY SWEET GREETINGS....PRINTABLE STAMP SET.  I love them all so it was hard to decide what set to use. I finally decided to use the Strawberry shaped card/template/cutting file.   This set comes with 4 sentiments and an matching envelope...the strawberry shaped card is approx. 4.5 by 5.5 inches..this file comes in the following formats: wpc, pdf and svg

Strawberry sentiments
These are the sentiments in the set 

~A little Sneak Peek~

You can see some of the detailed layering here.  I used pop dots to get dimension.


 For my card I used Ali Edwards Holiday collection (red).  I'm not sure where the green is from.  I downloaded when digital scrapbooking and hybrid crafting was new to me.  The cute flower is from MissMint_OopsyDoodle-flower11.  I used my silhouette cameo to cut everything out. 

I love the "stitched" look around the berry and leaves.   To learn how to do this see the tutorial below.

Here is a quick tutorial on Offset and Internal Offset.


 To start with you open the svg file into Silhouette Studio.  You will need to ungroup them first.  After you ungroup them, you will fill the stem part with patterned paper. The patterned paper icon is at the top of the screen with the polka dots in the box.  This will then pop up the choices of paper on
the right had of the screen.


I liked the "outlined" look for this project.  If you do not want to the outline to show, click on the multicolored lines at the top of the screen.  This will pop up a line color menu on the right.  The little box with the cross marks through it is the "no-line" feature.  You can also change the color of the outline here as well.


 Here is where you would change the style and thickness of your lines.  Click on the button with the black lines at the top of the screen.  This will pop up the menu on the right for several options.


After filling your shape with the patterned paper, the next step is to choose the offset button at the top of the screen. (his is the first step towards the dashed line)   Once it is chosen It will give you two options...an offset (which it on the outside of your shape) and the other is the internal offset.  This is the one we are doing for this step.  You will also need to slide the offset distance bar.  This will be where your dashed lines will end up.  Slide it around and you will see what it does.


Now for the dashed line.  You pick the button with the black lines at the top of the page.   Once it is picked, the option box on the right will pop up.  You can chose your line here and the thickness of your line.  Just play around with it.  If you don't like it, remember the "undo" button is unlimited.


Now we are going to an offset.  This give you that nice crisp white part around your image.  It's also known as the Sticker effect.  To do this, you will pick the offset button at the very top of the page.  After that is chosen, the right hand side will pop up.  This is where you will chose the distance for the offset.  You may want it closer or you may want it further away....again, just play around with it.
The next frame shows you what can happen if you pick the wrong layer.


When you pick the offset button, make sure the correct layer is picked.  The dashed lines is considered a layer and if you pick that layer, you will get the offset with more dashed lines. See the picture with the big red x on it.   You may have to move it around a bit to get the image and not the dashed lines. 


Now you will want to pull the off offset layer to turn it white.  To do this, you will pick the paint bucket at the top of the page.  It will pop up the color choices on the right hand of the screen.  After picking the color, line them back up.  Select the whole image and group it together.  The group button is at the bottom left of the screen.   The last picture is to show you that the outer layer is white. 
Now that you have completed these steps for the stem, you can continue to do the same thing with the strawberry.  Also once you get the first two steps done...right before you do the offset (outer) you will want to group together and pick The scissors to pop up the cut menu.  Make sure you do a no cut on those.  Once you have your outer offset done and group them all together, pick the "cut outer edge"  This way it will only print around the offset (very outside), giving you that "sticker" look.


  I hope that you enjoyed this Offset tutorial
I added a flower at the bottom of this card just to have a different look.

Stop by The Cutting Cafe' Blog.  There you will get to see all the other ladie's projects.  I can't wait until Wednesday's to see all the beautiful projects.  Don't forget to leave a comment for a chance to win up to 3 sets from The Cutting CafĂ©. 

Wednesday, April 3, 2013

I know Easter is over...........

I know Easter is over, but I wanted to post a project that I made.  My intentions were to get it done and posted for my project for Peppermint Creative before Easter, not after.  UGH!!!! 

For this craft, I sprayed the top of a parmesan cheese container in a tan color to match the paper that I used.  The paper is from Easter Blossom kit.  I also used one of the ovals from the Gingerbread Frames.  Oh and the bunny from Speckled Egg kit~brights.


I used Silhouette Studio and imported the paper, frame and bunny.  The bunny I cut out of a brown paint chip that I picked up from Wal-Mart some time ago. I did this by importing the bunny from the Easter Blossom kit, select the "trace outer edge" feature and then I cut it out.  I printed a whole page of the paper from the Easter Blossom kit.  For the oval scalloped frame (Gingerbread frames), I used the Select Trace Area feature, click the high pass filter (so that it is unchecked) and then move the threshold slide bar until the area is all highlighted.  Once you do this, select "trace outer edge" button.  You can then move the frame off to the side and fill the "traced" frame with whatever color you like.  I also used the oval to cut an oval in the printed paper that I printed earlier.  For finishing touches, I used two way glue and prisma glitter on the oval.  Hope this helps.

I filled the container with these cute little milk chocolate bunnies. (pictured above)
Don't forget to stop by and check out all of the awesome products that Peppermint Creative has to offer.

Like I said, I know it's after Easter, but maybe you could do this for another holiday or for a gift for a friend.  Fill it with their favorite candy and of course use a birthday theme, or whatever fits the occasion.


Tuesday, March 26, 2013

Another candy holder for Easter....

Here is another design project that I did for Peppermint Creative.  I forgot to include it in my last post.  I used the Hoppy Easter Paper pack.  Now 30% off.


I used the paper from the Hoppy Easter paper pack.  I also used a template from the Silhouette store called pillow box w pop out flower.    

Easter_Blossom

Monday, March 25, 2013

Hippity Hoppity..........

Can you be you believe Easter is this weekend?  I don't think we have even made any plans yet.  Time is flying by waaaaay too fast.  This past weekend I worked on some projects for Peppermint Creative.  For these projects I used Hoppy Easter Elements, Hoppy Easter papers and paper from the Easter Bloom kit.

Hoppy Easter Elements

I used the print and cut on my Silhouette Cameo.  It took me a while to get the circle around the bunny just right.  Silhouette studio is having a couple glitches since the last update.  I hope that you enjoy the following Hybrid projects that I made.  I also use the "Jelly Bean Goodie bag holder/cutting file" from The Cutting Cafe.

easter_blossom_goodie_bag

peppermint_creative_goodie_bag
goodie_holder_hoopy_easter
bunny_jelly_bean
3_goodie_bag_holders
 
Take a minute and stop by Peppermint Creative, you won't be disappointed.
Thanks for Stopping by!!

Monday, March 18, 2013

Well Finally....

I finally did it!  I posted the blinkie for Peppermint Creative.  Gosh, I'm not sure quite why that took me soooo stinkin' long to figure out.  Sometimes I wonder.  I think it's true, the older you get, the more you forget!!

Okay, so now onto the fun part!  My very first Design Team Project.  I used the Miso Lucky kit designed by Miss Mint at Peppermint Creative. 


I used the Silhouette Cameo to cut the images and applied them to a gift box that I made out of a recycled box (a Wal-Mart stock lady gave them to me)

Want to get this amazing kit for FREE?  Make a $10.00 purchase at Peppermint Creative!!!  Check it out now.
Misoluckyblog


Offer ends Tues. Mar. 26th (midnight EST)

Sunday, March 17, 2013

An Apple a day...........

An apple a day keeps the doctors away, or so they say.   I don't know if this actually works, because I haven't done it.  Maybe I should test this well known rhyme.  It would be alot healthier than all the junk I like.  Is it too late for another New Year's Resolution?

This week at The Cutting Cafe the design team were given the choice of using Birthday Fun, Fun With Dress Forms or the Apple Box set.  I chose the Apple Box set.  To celebrate the Holiday, "St. Patricks Day" the project was done in green colors. 
APPKLE SEMTI,EMTS
 (Sentiments in the set)
 
 
For this project I used digital paper that I got free at kevinandamanda.com.  I also used craft cardstock that I purchased at Hobby Lobby.  To cut out the apple, I used the print and cut feature on my handy dandy Silhoutte Cameo.  Did I ever tell you how much I love this machine?  For the light green square I used the color picker in the Silhouette Studio program.