Tuesday, July 30, 2013

Christmas in July.........

Phew, this year has gone by way too fast for me.  I still can't believe in two days we will be in August.  This means back to school time.  My youngest son starts his Senior year next week, I'm sooooo not ready!  It will be an empty nest for sure.  I'm trying really hard not to focus on that, but to help him enjoy his last year of high school. 

Last year at this time I told myself I would have my Christmas cards planned and at least started.  July passed, then August, September, October.......  Yep, you guessed it, I didn't get them done.  By the time December rolled around, I had ideas in my head, but they never got passed that.  So this year, I already have two ideas and both are jotted down. 

For this week's project for The Cutting Café, we got to choose from the following three sets:
CHRISTMAS CARD FUN...TEMPLATES - CUTTING FILES,  SNOW GLOBE SHAPED CARD....TEMPLATE - CUTTING FILE,  or the CHRISTMAS CAR...PRINTABLE STAMP.

I chose the Christmas Card Fun/template/cutting file.  As soon as I saw this set, I knew it was the one I would use.  I love Snowflakes!!  My Christmas tree has different sized snowflakes all over it.  So again, when I saw that a snowflake was a choice in this set,  I knew what I was going to do for my card.

This set includes:  12 different Christmas cards. The cards come with a matching size envelope. The card base is approx. a little bigger then 4.5 by 4.5 inches...The set also includes 17 sentiments that go along with the Christmas Cards...This set comes in the following formats: WPC, PDF AND SVG

CHRISTMAS CARD
Here are the card fronts to this set.  Cute, aren't they!?!

 
Supplies Used:
Kraft Card Stock - Hobby Lobby
White Card Stock - Stampin' Up
White Gel Pen - Stampin Up
Double sided tape - Hobby Lobby
Glitter - Hobby Lobby
 
To make this card I used my FAVORITE tool...my silhouette Cameo!!!
I opened the snowflake card in Silhouette Studio.  First, I ungrouped the card and did a copy and paste of the snowflake to a new page.  I then did an offset of the snowflake and moved the offset back over to the card.  I have a tutorial on how to make an offset here.  I made a few more copies of the snowflake and cut them out in white cardstock.  I layered the snowflake with the extra snowflakes that I cut out, giving it some dimension.    
 
Oh, I can't believe I finally found a white gel pen (this is what I used to do the stitch marks on my card).  While ordering some supplies from Stampin' Up, I decided I had better take one last look before finalizing my order.  I couldn't believe it......there they were....WHITE GEL PENS!!!!  I ordered several.  It was the first thing I went to when my order arrived.  I couldn't believe it, they write soooo good AND on the first try.  I'm hooked!!   
 

Here is the pen I used for the stitch marks.


You can see the dimension of the snow flake here
 
Stop by The Cutting Cafe to see all the great Christmas sets as well as others  And don't forget to stop by The Cutting Café Blog to see other design team's projects and leave a comment to win free sets.
 
Have a great week!! 


Monday, July 22, 2013

What girl doesn't love pretty nails and cute toes......

Summer time is the perfect time for flip flops!!!  Every girl can't wait to get a pair of cute flip flops on.  That means you have to have cute toes and of course nails to match.   I have never had a girls night out...I know, but it is true. (Yes, I live a pretty boring life)  My idea of a girls night out would be movies, munchies, facials and of course manicures and pedicures.  That sounds fun to me!   I think it's time to have a spa day!

Regina at The Cutting Cafe' made the  perfect set for this "girlie" occasion.  It would be such a cute idea for a girls party.  I know if I had a little girl, we would definitely have a spa day.  What about for the bride and her wedding party? 


This NAIL POLISH SHAPED CARD INVITE - template and cutting file set features the following:
1 shaped card - approx 5 by 2.5 inches (using the outline shadow)
Envelope template
4 assorted invite sheets (they also come several on a page for mass printing)
18 sentiments - 9 are mini words
The set comes in the following formats: PDF, WPC, MTC and SVG
 
 
Supplies:
Black Card Stock
White Card Stock
White Ribbon
Turquoise Paint Chip - (I love recycling things!)
A Round Array stamp set - Stampin' Up!
 
Used my Silhouette Cameo with Silhouette Studio Edition
 
2013-06-27_205118
These are some of the sentiments in this set
 
To check out other team member's projects, stop by The Cutting Cafe's Blog on Wednesday.  Don't forget to leave a comment to win free sets from The Cutting Café store!
 
Thanks for stopping by!!

Wednesday, July 10, 2013

Joining in on the [stache] fun!

Everywhere you look right now, you see a [stache].  Not sure how it all got started, but I do love it.   The receptionist at my Chiropractor has one tattoed on her finger.  It's in a spot that she can put her finger up to her face (above her lip...of course) and it reveals her cute little mustache tattoo.  She said she had been wanting a tattoo, but wasn't allowed to have one at work.  This way no one knew she had it unless she showed it to them.  It Too each their own I suppose.  It is cute, just saying!
For this [stache] card and little gift box, I used the LIP KIT: My Guy Edition 4x6" Journal & Filler Cards and  My Guy Kit.
      

I designed this cute "THANK YOU" card in Silhouette Studio

I used the 4x6 card out of the My Guy Filler Journal and Filler Kit.  I added the mustache out of the My Guy Kit.  I then typed "Thanks for the [stache].  I used the print and cut feature, so once I liked my design, I hit print and then ran it back through my Cameo to cut it.   That's it!!  Simple right?!?  That's what I love about the LIP Kits, it's not only easy to put a quick scrapbook page together, but it's also easy to put a quick card together too! 

 
For this little gift box, I used paper from the My Guy Edition.  I purchased the box from the Silhouette Online store.  I simply printed my paper first and then opened the box file and sent it through my cameo.  I also designed the tag in Silhouette Studio and added a little [stache]. 
 
Don't forget to stop by Peppermint Creative and pick up the FREE Kit.


Tuesday, July 9, 2013

Time for a Cutting Cafe' project........

Even before I became a Design Team Member for The Cutting Cafe', I wanted this template.  When Regina gave this template as one of our choices to design with this week, I couldn't wait to get started.  There was only one problem....I didn't have any copic markers!  I know, who doesn't
have any copic markers?  I have been wanting some, but I just don't even know what colors to start with.    BUT....I love this box and I decided to show you how versatile The Cutting Cafe' files are.  Oh, and I will be making this box again, but using the window part and it will have copics in it.


This COPIC BOX template - cutting file set features 4 COPIC BOXES

One Copic Box with a front window
One Copic Box Plain
One half Copic Box (after assembled, there is no top part.....displaying the pens in the box) SEE SAMPLE BELOW
One Copic Box with a perforated middle part that can be torn off at a later time.
Each box will hold 3 Copic Sketch pens.
The set comes in the following formats: PDF, WPC AND SVG
The set also comes with 4 sentiments
 
COPIC BOX
 
I decided to turn this template/cutting file into a little candy treat for a my friend's little girl.  Her little girl loves pixi sticks and with her birthday right around the corner, I thought this would be perfect.
 
I opened this file in Silhouette Studio Edition, picked from the patterns they already have loaded and cut a cute flower out that I bought from the Silhouette Online store.  Easy Peasy! 
If you don't have a cutting machine, this file is super easy to hand cut.  Mrs. Regina makes the files super simple to use with just a pair of scissors.   
 
 
Hope you enjoy this project as much as I did making it.
 
 
Here is a close up of the "tear away" part
 
 
Now head on over to The Cutting Cafe's blog and see all the other designer's projects.  They have been designing some really awesome projects.  And don't forget to leave a comment for a chance to win free sets. 
 

Feel free to leave a comment here about this project. 

Thanks for stopping by Tanya's Creative Space

Monday, July 8, 2013

Doing What I Love and Loving what I Do...

This weekend was a hot one around here.  Can't complain too much because last week was beautiful, especially for July!  I had no desire to be in the heat at all, NONE!  So any excuse to work on my projects is a good excuse for me.

Since I didn't get out this weekend, except to let the dog out (she's a puppy and tends to go out a lot..UGH!), I was able to finish some of my ideas.   Miss Mint at Peppermint Creative has been really busting out some new kits and new LIP Kits that coordinate with existing kits.  For this project I used the My Guy LIP 4x5 journal and filler cards Edition.  But first a Sneak Peek of my project.

  You'll never guess that this is made out of the My Guy Kit!!!!
 
This kit below is the one I used for this project and for the project I will post tomorrow.  They are totally different.  I think you gonna love it.

LIP KIT - My Guy Edition
Here are some of the other kits in the My Guy Edition:
 Okay, now for the Actual Project.  If you guessed it was a card with a flower, you guess right!!!  You guys are smarter than I thought! Hehe
  This is actually a box...you can use it for the card I made or a cd or jewelry.  I'm going to add the card along with a gift card and gift it to a special friend of mine.
This is the card I made to go with the gift box.  Both the Box file and the flower files came from Silhouette America online store.  I think the flower is made by Lori Whitlock.  She is quite the designer.  I love her work. 
If you have any question on these projects, feel free to ask away. 
Thanks for stopping by!!
And don't forget to stop by tomorrow!  I will have Two completely different projects for you, using the same kit.


Wednesday, July 3, 2013

Have you noticed all the beautiful butterflies......

This summer is flying by way too fast.  Even my youngest, who is now a Senior, said the same thing today.  We haven't done anything special this summer, so I think secretly he's glad it's flying by and is ready to start his senior year.   Another thing that has been flying by are beautiful butterflies.  When the boys were younger, they would catch butterflies in these really cute cages.  Of course, after admired, they had (were suppose) to let them go.

This week's project for The Cutting Cafe' we got to choose from Butterfly themed sets.  I chose this Butterfly shaped card/template/cutting file.

Butterfly shaped card
 
To see other Butterfly sets, go HERE.
 
Hope you enjoy my butterfly creation.
 
 
I opened the butterfly cutting file into Silhouette designer studio.  I did some offsets to get the working around the butterfly.  I also cut an extra butterfly for dimension.  Added ribbon for the body and some jewels for some bling.  I really wanted to sew it with my sewing machine, but I'm alittle nervous.
 

Close up of the details


Hope you enjoy my card.  I really enjoyed doing it.  Go by The Cutting Café's blog tomorrow and look at the other Design team's projects, you won't be disappointed.  These ladies are amazing.  Also don't forget to comment, because every week Mrs. Regina gives a way sets (a lot of times it's three)
THANKS FOR STOPPING BY!!!
Have a wonderful day!
 

Wednesday, June 26, 2013

Another Strawberry Surprise...........

I'm on a roll with strawberries.  Strawberry icecream, strawberry short cake, strawberries dipped in chocolate (my favorite), etc.  I bought some last week and they were huge and sooooo sweet....yummy!  Time to get some more!

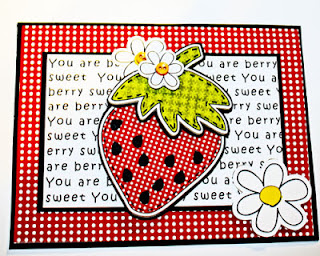
For this "Thank You" card, I wanted to show you how versital the Life in Pictures digital kits can be.  I used the LIP kit-Berry Sweet from Peppermint Creative.  Right now it's a FREE download on the Peppermint Creative Facebook page.  If you haven't been there lately, you should go here to check it out.  Miss Mint has added several new LIP kits.  If you are busy and on the go, this is the way to go.  They are perfect for the digital or hybrid scrapper.


I made these for my friend that lost everything in the tornado.  I'm going to give them to her with the Silhouette Portrait that some of you wonderful ladies donated to.  I can't thank you enough for your donations and prayers.  There is still ALOT to do, but they are on they're way to getting things in order. 


I used my handy dandy silhouette cameo to design and to cut out the little strawberry for some dimension.  The base of the card was the 4x6 brown polka dot card that had the pink strip on it already.  The red "you are so berry sweet" was a embellishment already made in the kit.  I added "Thank you" and that is it!! 

Used pop dots for some dimension.


Thanks for stopping by! 

 Don't forget to check out all the new kits at Peppermint Creative.

I hope everyone is having a great summer / offset tutorial

What memories do you have of summer?  Vacation, popsicles, flip flops, swimming pools and of course, for some, picking (and eating) fresh strawberries.  Even though I have attempted many times on my own to grow strawberries and have NOT been successful, I always enjoyed picking them from the neighbors garden.  So when I saw that this weeks theme for The Cutting Cafe' was strawberries, I was very excited. 
 
We had the following three sets to choose from:  STRAWBERRY TREAT BOX or STRAWBERRY SHAPED CARD...TEMPLATE - CUTTING FILE or BERRY SWEET GREETINGS....PRINTABLE STAMP SET.  I love them all so it was hard to decide what set to use. I finally decided to use the Strawberry shaped card/template/cutting file.   This set comes with 4 sentiments and an matching envelope...the strawberry shaped card is approx. 4.5 by 5.5 inches..this file comes in the following formats: wpc, pdf and svg

Strawberry sentiments
These are the sentiments in the set 

~A little Sneak Peek~

You can see some of the detailed layering here.  I used pop dots to get dimension.


 For my card I used Ali Edwards Holiday collection (red).  I'm not sure where the green is from.  I downloaded when digital scrapbooking and hybrid crafting was new to me.  The cute flower is from MissMint_OopsyDoodle-flower11.  I used my silhouette cameo to cut everything out. 

I love the "stitched" look around the berry and leaves.   To learn how to do this see the tutorial below.

Here is a quick tutorial on Offset and Internal Offset.


 To start with you open the svg file into Silhouette Studio.  You will need to ungroup them first.  After you ungroup them, you will fill the stem part with patterned paper. The patterned paper icon is at the top of the screen with the polka dots in the box.  This will then pop up the choices of paper on
the right had of the screen.


I liked the "outlined" look for this project.  If you do not want to the outline to show, click on the multicolored lines at the top of the screen.  This will pop up a line color menu on the right.  The little box with the cross marks through it is the "no-line" feature.  You can also change the color of the outline here as well.


 Here is where you would change the style and thickness of your lines.  Click on the button with the black lines at the top of the screen.  This will pop up the menu on the right for several options.


After filling your shape with the patterned paper, the next step is to choose the offset button at the top of the screen. (his is the first step towards the dashed line)   Once it is chosen It will give you two options...an offset (which it on the outside of your shape) and the other is the internal offset.  This is the one we are doing for this step.  You will also need to slide the offset distance bar.  This will be where your dashed lines will end up.  Slide it around and you will see what it does.


Now for the dashed line.  You pick the button with the black lines at the top of the page.   Once it is picked, the option box on the right will pop up.  You can chose your line here and the thickness of your line.  Just play around with it.  If you don't like it, remember the "undo" button is unlimited.


Now we are going to an offset.  This give you that nice crisp white part around your image.  It's also known as the Sticker effect.  To do this, you will pick the offset button at the very top of the page.  After that is chosen, the right hand side will pop up.  This is where you will chose the distance for the offset.  You may want it closer or you may want it further away....again, just play around with it.
The next frame shows you what can happen if you pick the wrong layer.


When you pick the offset button, make sure the correct layer is picked.  The dashed lines is considered a layer and if you pick that layer, you will get the offset with more dashed lines. See the picture with the big red x on it.   You may have to move it around a bit to get the image and not the dashed lines. 


Now you will want to pull the off offset layer to turn it white.  To do this, you will pick the paint bucket at the top of the page.  It will pop up the color choices on the right hand of the screen.  After picking the color, line them back up.  Select the whole image and group it together.  The group button is at the bottom left of the screen.   The last picture is to show you that the outer layer is white. 
Now that you have completed these steps for the stem, you can continue to do the same thing with the strawberry.  Also once you get the first two steps done...right before you do the offset (outer) you will want to group together and pick The scissors to pop up the cut menu.  Make sure you do a no cut on those.  Once you have your outer offset done and group them all together, pick the "cut outer edge"  This way it will only print around the offset (very outside), giving you that "sticker" look.


  I hope that you enjoyed this Offset tutorial
I added a flower at the bottom of this card just to have a different look.

Stop by The Cutting Cafe' Blog.  There you will get to see all the other ladie's projects.  I can't wait until Wednesday's to see all the beautiful projects.  Don't forget to leave a comment for a chance to win up to 3 sets from The Cutting Café. 

Wednesday, June 19, 2013

Oh my boys are going to kill me!

I made this layout using LIP sets from Peppermint Creative.  Life in Pictures (also referred to as Project Life) seems to be the way to go.  I love that you can put a page together so quickly.   And the kits don't have to be limited just to layouts.  You can go hybrid and make note cards, thank you cards, fridge magnets, etc. 

The following sets were used on my layout. 
LIP KIT: Funktography Edition 3x4" Journal & Filler Cards,  LIP KIT: Funktography Edition Jazzers & Life in Pictures: Prompt Card Templates - Family.  I also used the  
Letterboard Alphabet - Brown (this set is free with just a purchase of 1.00)

LIP KIT: Funktography Edition 3x4" Journal & Filler CardsLIP KIT: Funktography Edition JazzersLife in Pictures: Prompt Card Templates - Family

Letterboard Alphabet - Brown

 
I used the brackets from this set.  I put one at the beginning of the page and one at the end of the page.  At first my friend didn't like it and then I explained that everything within the brackets is the story I'm telling.  She liked it then.  Thought about taking them out, but I kinda like them.

Don't forget these Brown Letterboard alphabet can be yours for FREE.  With just a $1 purchase.  You can beat that. 
And right now there is a couple of other free things.  One at Peppermint Creative and another on Facebook.  They go together...so co check it out.


Here is my page:  The boys are going to be upset I used them....but I will call it payback for all the times they don't listen to me.
 

Thanks for stopping by!!  I hope you enjoyed my page!!!!  Please feel free to leave comments!  I love to read what everyone has to say.  This is one of my first pages in quite some time.  Like I said, I thought it was fun, but I'm sure they wouldn't agree~

Don't forget to go to www.peppermintcreative to check out all the other kits that Miss Mint has been working on.  She rocks.  There are lots of new LIP kits and of course this freebie below.

This is the amazing free kit!  I love it. You can check out the Gallery to see some really great layouts and hybrid pages.