
These are the sentiments in the set
~A little Sneak Peek~

You can see some of the detailed layering here. I used pop dots to get dimension.

For my card I used Ali Edwards Holiday collection (red). I'm not sure where the green is from. I downloaded when digital scrapbooking and hybrid crafting was new to me. The cute flower is from MissMint_OopsyDoodle-flower11. I used my silhouette cameo to cut everything out.

I love the "stitched" look around the berry and leaves. To learn how to do this see the tutorial below.
Here is a quick tutorial on Offset and Internal Offset.

the right had of the screen.


After filling your shape with the patterned paper, the next step is to choose the offset button at the top of the screen. (his is the first step towards the dashed line) Once it is chosen It will give you two options...an offset (which it on the outside of your shape) and the other is the internal offset. This is the one we are doing for this step. You will also need to slide the offset distance bar. This will be where your dashed lines will end up. Slide it around and you will see what it does.


Now we are going to an offset. This give you that nice crisp white part around your image. It's also known as the Sticker effect. To do this, you will pick the offset button at the very top of the page. After that is chosen, the right hand side will pop up. This is where you will chose the distance for the offset. You may want it closer or you may want it further away....again, just play around with it.
The next frame shows you what can happen if you pick the wrong layer.


When you pick the offset button, make sure the correct layer is picked. The dashed lines is considered a layer and if you pick that layer, you will get the offset with more dashed lines. See the picture with the big red x on it. You may have to move it around a bit to get the image and not the dashed lines.

Now that you have completed these steps for the stem, you can continue to do the same thing with the strawberry. Also once you get the first two steps done...right before you do the offset (outer) you will want to group together and pick The scissors to pop up the cut menu. Make sure you do a no cut on those. Once you have your outer offset done and group them all together, pick the "cut outer edge" This way it will only print around the offset (very outside), giving you that "sticker" look.
I hope that you enjoyed this Offset tutorial
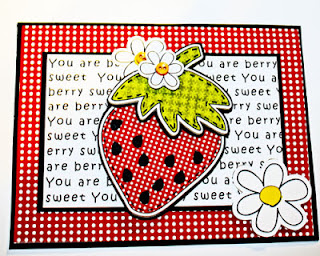
I added a flower at the bottom of this card just to have a different look.
Stop by The Cutting Cafe' Blog. There you will get to see all the other ladie's projects. I can't wait until Wednesday's to see all the beautiful projects. Don't forget to leave a comment for a chance to win up to 3 sets from The Cutting Café.
gorgeous!! I want one of those machines now!!
ReplyDeleteThanks!! You should get one...you won't be disappointed. It's worth every penny. Brings crafting to a whole new level.
ReplyDeleteoh my oh my oh my sooooooooooo CUTE..........and thanks for the tutorial
ReplyDeleteI love the text behind the berry. Great tutorial too.
ReplyDeletesuper sweet card and thanks so much for the tut!! going to try that soon :)
ReplyDeleteHi Tanya. This project is SWEET!! I love that you used the red gingham. So country looking and perfect for starwberry images. Thank you so much for sharing the tutorials!
ReplyDeleteThanks ladies...You are welcome for the tutorials. I hope they help.
ReplyDeletedarling card!
ReplyDeleteYour card is cute as can be and your tutorials are amazing.
ReplyDeleteGreat tutorial Tanya. Especially the stitched look.
ReplyDelete