Sunday, December 8, 2013

Christmas Floating Ornament

How to Make a Floating Ornament


Supplies Used:

Dear Santa Element pack
Candy Cane digital paper
Transparency sheets
White vinyl
Silhouette Cameo
Silhouette Studio Designer Edition
Two way glue pen
White glitter
Glass ornament
 
I used Studio Designer Edition and my Silhouette Cameo to make and cut my design, but you can use any photo editing software.


Making the Template

Step 1:


Draw a Circle and a triangle by using the drawing tools on the left side of the page.


Step 2:
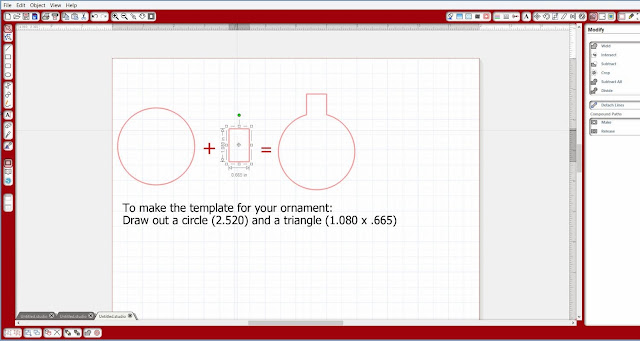

The dimensions for your circle is 2.520 and the triangle is 1.080 x .665  You can put type the dimensions in by using opening the scale window on the right side of your screen.


Step 3:


Weld your two shapes together using the welding tool.   Now that you have your template made you can move on to the next steps.

Designing the Inside of the Ornament

 
For this ornament, I used digital kits from Peppermint Creative.  For this one I used
 
Candy Cane Christmas PapersDear Santa Elements 


Step 1:


For this ornament I used the Santa out of the Dear Santa element pack and paper from the Candy Cane digital paper.  To start, draw another circle the same size as your template and fill it with the Candy Cane graffiti green paper.  Once filled, go to your advance options. 
 

 Step 2:


To make it look even more dimensional, I changed the transparency of the paper.  After choosing the advanced options, find the transparency bar and slide it to 45%.
 

Step 3:

 
Now open the Dear Santa Element pack and select the Santa.  Resize it to fit into the circle and drag it over the top of the paper.

Printing the Ornament


One of the neat things about the Silhouette Cameo is that it has a "Print and Cut" feature.  To do this your have a couple of steps you need to follow.


Step 1:


The first thing to do is to pick the size of your paper.  My printer only prints up to a 8 1/2 x 11, so I choose the letter option.


Step 2:


To be able to cut after printing you have to turn the registration marks on.  


Step 3:


The transparency sheets are very expensive, so I made sure to fill the page before I hit the print button.

 
You can see here what the transparency looks like after printing.  I laid half of it on a white sheet so you can see the difference.
 

Cutting out the Ornament


If you aren't using a cutting machine, you can stop here and simply print your image and use a pair of scissors to do your cutting  (you don't have to have a cutting machine to make these ornaments).

Step 1:


Now you will choose the Cut Setting Options.  Here is where you will choose the speed, thickness and blade setting.   I chose a speed of 3, thickness of 33 and set the blade at 6.   Sometimes this is where you have to play around with the cut settings because materials differ in thickness and textures.  

Make sure to manually change your blade setting.  I have changed it on the screen but forgot to change it manually and had to go back and cut it again.

Step 2: 

 
After printing you will put the sheet on your cutting mat.  Because the sheets are transparent you will have to put a small piece of paper behind the registration marks so that the machine can read them.  I got this tip from The Silhouette Challenge group.  I don't remember who suggested it, but it does work.  Thanks so much for the tip.


Here is what it looks like after it is cut.


Step 3:


You will cut an additional template out in white vinyl.  This is so that your image will show up.  Be sure to change your cut settings for vinyl.  Also manually change your blade.


Step 4:


Apply the vinyl cut out to the printed acetate sheet.  To do this, I laid the vinyl down with sticky side up.  I then started at one end matching it up and sticking it down.  You may have another way that works for you, but I have found this way to work best for me.

Embellishing


Step 1:


Use your glue pen on the beard, hat and cuff parts. 

Step 2:

Add the glitter. 
 
 
Tap off excess.


Assembling


Step 1:


Now just roll the insert up.


Step 2:


Take the top off the ornament, put the insert in and put top back on and your finished.
If you need to straighten your image up a bit after it unrolls, simply use a pair of tweezers.


There you have it!!  Isn't it cute?  The possibilities are endless. 
I made a bunch for Christmas gifts for Family and friends in Louisiana.  They were a hit!! 


Extra steps:

You can cut ribbon and add to the top of your ornament.  I was putting pieces of ribbon through the small hole at the top and it kept popping of the ornament.  I read on one of the Facebook groups to take a piece of floss and tie your ribbons to it and then thread through the hole at the top of the ornament.  I haven't tried it yet, but it sounds a heck of a lot easier. 

You can also cut vinyl and put on the front of the ornament to make it bit more personal.


Thanks for stopping by my crafting space!!


Hope everyone has a VERY MERRY CHRISTMAS!!


Saturday, December 7, 2013

Ornament Gift Card Holder

Boy is it cold outside.  No going out for me, so I was able to work on several projects today.  Yeehaw!    Here is one that I did, a Christmas gift card holder. 


Altered a cutting file from the Silhouette Online store and the Candy Cane Christmas Elements pack from Peppermint Creative.


Candy Cane Christmas Elements
 
Thanks for stopping by my crafty space!  Have a great weekend.


Friday, December 6, 2013

It's Christmas time!!!

I can hardly believe it's Christmas time again!!  It's my favorite time of year.  I have a lot to be Thankful for, my husband, my children, my friends and family, my home, my pets, but MOST of all for our Saviour Jesus Christ.  With all the hustle and bustle of giving and getting, we often lose the true meaning of Christmas, which is Christ. 

I have been out of pocket for a while.  Life sometimes has different plans than we do.  I'm going to try to catch up a little and share some Christmas projects I've been working on.

Today I want to share these cute "floating" ornaments I made.   I first seen this idea at The Sewer, The Caker, The Copycat Maker.  The possibilities are endless.  We recently took a trip to see my family in Louisiana.  I made several for family and friends there.   I have a picture posted at the bottom of this post.  It's not a great one, but you can see the idea.  I do have a tutorial in the works and will post it as soon as I finish.  I really wanted to share these before it's done though. 


Candy Cane Christmas Papers
 
Supplies:
Candy Cane Digital Papers
Dear Santa Elements
Projector sheets
glass bulbs
assorted ribbons
printer
Silhouette Cameo with Silhouette Studio Designer Edition software


Used the "print and cut" feature.


Hope you enjoy and hope everyone is having fun getting ready for Christmas.  I plan to work on Christmas gifts this weekend.  Wish me luck!!


Tuesday, October 29, 2013

Happy Halloween!!

I know it's been a while.  Things have been crazy, I'm sure most of you can relate.  I have been doing some creating and wanted to share with you.  I made these cute treat tags and cards with the NEW digital Halloween kit from Peppermint Creative.  I really L O V E the new Funkin Pumpkin set. 

I filled clear cellophane bags with candy and attached the tags I designed with black jute ribbon.  Now how cute are these?  The elements in the kit are so cute.  I couldn't resist making matching cards.

I designed these tags in Silhouette Studio design addition and cut them out with my handy dandy Silhouette Cameo.  

For this tag, I used this really cute spider and the spider web paper for the background.
   
For this tag, I just simply used the Trick or Treat banner and layered it on the diagonal striped paper.


The Funkin Pumpkin set includes:
13 papers, 3 frames, 4 epoxy stickers, 4 flowers, 4 felt shapes, 2 confetti bursts, 1 branch, 2 lace edges, 2 arrros, 1 ribbon, 1 candy corn splatter, 1 scalloped edge, 2 wood signs, 1 flag edge, 1 fence, 1 felt flourish, 1 round frame, 1 pumpkin seed splatter, 2 pumpkins, 1 spider, 2 film frames, 1 string, 1 stick, 24 word art, 2 stickers, 1 alphabet set (a-z, 0-9 !? {} % ").


Below are the two cards that I also designed in the Silhouette Studio Design Edition using the same kit.
 
I made it look like a grave yard of pumpkins and layered one in the center with pop dots.

 
This card is simple, but I love the look of it.  The Trick or Treat banner is also layered with pop dots for dimension.
 
And last, but not least, a little treat box using one of the cutting files from the Silhouette on-line store.
 
 
Used the diagonal striped paper and The little "H is for Halloween" element from the kit.  Finished it off with a black ribbon.
 
Go to the shop and check out all the Halloween sets (and more).  
 
Right now until October 31st, Halloween sets are on sale. 


Funkin Pumpkin Halloween Kit + LIP Bundle
 
Thanks so much for stopping by!

Hope everyone has a save and Happy Halloween!!


Monday, October 14, 2013

Decorated Pumpkins

My Decorated Pumpkin

Did I ever say how much I LOVE Fall?  I love love love it!  I couldn't wait for the October Silhouette face book challenge so I could do a Fall project.  I knew I wanted to use a new medium, so I decided to use the double sided sticker sheets and decorated a pumpkin. 
 
Here is my pumpkin!   Not only do I love how it turned out, I love how easy it was to use the adhesive.  I debated weather to do a monogrammed or something that was Halloween.  I knew that I didn't want to do anything scary.  I don't think this is too scary.


For this project you will need:
 
Double-sided adhesive sheets
glitter
pumpkin
small paint brush


Step one was to find a image that I liked.   I then measured my pumpkin and then sized my image to fit.  Next is to make sure you pick the right medium and to move the blade to the appropriate number.
 
 
There is a yellow side and a white side to the adhesive.  Make sure when you load into your machine that the white is facing up.


Just like vinyl, you have to weed. This way the parts you don't want to have glitter on will be gone. 


This is what it looks like after it's all weeded.

 
Peel off the white backing and stick to you pumpkin.  Make sure that you rub the whole image down.

 
Once the image is on the pumpkin, remove the yellow backing to reveal the sticker sheet.

 
Now you will pour the glitter over the entire sticker.

 
I put a 12x12 piece of cardstock down and tapped the pumpkin.  Most of the glitter fell off, but you will still have some left to remove. To do this, use a small paint brush to knock off the excess.

 
This is how it will look when finished.  Super easy!!!

 
I really like how it turned out!
 
The Silhouette Challenge - A Series By The Thinking Closet & Friends
 
Now it's time to check out all the other great projects in this months challenge.  Just click on the links below to view everyone's projects.
 
Birthday Invitations Homer Simpson Style by Black & White Obsession
DIY Planner Dividers by The House on Hillbrook
3D Haunted Forest by Chicken Scratch NY
Pumpkins and Peacocks Fall Mantel by joy & gladness of heart
DIY Cheers Garland by Rain on a Tin Roof
Wedding Gift Wrapping by It Happens in a Blink
Glitter Monogrammed Pumpkin by unOriginal Mom
Halloween Family Rules by Tried & True
Faux Stitched Speech Bubbles by Get Silvered Craft
A Mario Bros. Backsplash by Please Excuse My Craftermath...
Halloween Spooky Eye Luminaries by A Tossed Salad Life
Halloween Party Treat Bags by The Thinking Closet
"Create" Wooden Pallet by Lil' Mrs. Tori
Decorated Pumpkins by Tanya's Creative Space
Cute Wedding Card by Zanaree
Learn to Tie Your Shoes by From Wine to Whine
Halloween Banner by Sowdering About
 
Interested in joining us for our group posting event next month?  We'd love to have you. Simply fill out the new member request form, and Lauren from The Thinking Closet will get you squared away."