Showing posts with label hybrid projects. Show all posts

Monday, September 29, 2014

It's Been A While.......

 I've been MIA lately.  Without going into the details, life has been a little nuts lately.  Summer, family, work, etc. etc.   I know that is not a excuse, but that is what has been happening. 

One of the fun things I got to do lately was work with this fun digital scrapbook kit called Party Pants from Peppermint Creative.    I really love the fun colors in this set.  The balloons, the cake, presents....just so much fun party stuff.  


http://www.peppermintcreative.com/index.php?main_page=product_info&cPath=133_1&products_id=2830
 
Here are a couple of hybrid crafts that I made with this kit and my Silhouette Cameo.  The first one is one of my favorite cards.  It is made with the balloons and the Celebration word art.
 
 
I made a card base 4 x 5 and enlarged the balloons to where they were "off" the sides of the card.  I also printed an extra copy and cut around some of the balloons and layered them to add dimension.  I used black twine and tied it around a few of the balloons.
 
Here is another card using the birthday cake.
 
 
One of my favorite things to do with my Cameo is Print and Cuts. 
For this print and cut, I cut out several extra pieces and adhered to the base of the card with pop dots
 to give dimension. 
 
And last but not least, is a cute little box that I made with the paper from the Party Pants kit.
 
 
Hope that these hybrid projects inspire you to take out your favorite digital kit and make something fun. 
 
Have a GREAT week!
♥, Tanya
 

Thursday, April 10, 2014

It's Almost Here

Friday, yep it's almost here.  Work has been a little stressful these days, so I'm really looking forward to my weekend OFF!!  I'm ready to do some gardening and working on  my flower beds.  I'm ready for some COLOR!  I'm so tired of looking at all the dead brown colors.   That's what I really want to do, it's the plan, but we all know plans don't all work out!  Hoping it will this time!

Another thing I would like to do is to work on some crafting projects.  And in case you would like to do the same, I'm sharing some projects I've worked on this past week. 

Here they are, these cute little boxes that I made with my Silhouette Cameo and this adorable new kit in the Hello Collection Series....Hello Giggles from Peppermint Creative.


http://www.peppermintcreative.com/index.php?main_page=index&cPath=187_200


I love making gift boxes and with Graduation quickly approaching, I thought this would be perfect.
 
 
http://www.peppermintcreative.com/index.php?main_page=product_info&cPath=187_200&products_id=2745
 
Aren't these papers from Peppermint Creative soooo stinkin' cute!?!  I absolutely love all the colors....so bright and cheery!!


 Here is a close up of the flower that I purchased from the Silhouette on-line store.  I used the color picker in Silhouette Studio Designer Edition to make sure the color matched exactly to the paper. 
 
 
The color picker is on the right side of your page.  You can pick a color out of the pallet or if you want the shade to really match, you can pick a color from your project you are working on.


To pick a color from your project, just click on the picker on the right and hover over the color you want from the project you are working on. 


Here is another made with the papers from the Hello: Giggles series!  These would be perfect for "Thank You's" at a wedding, bridal showers, birthdays and more.  I have a wedding invite in the making (one of my plans for this weekend)  I'll have pictures posted soon (If my plans don't fall through).
 
Thanks for stopping by and I hope everyone has a GREAT and WONDERFUL weekend!!


Sunday, February 9, 2014

LOVE IS IN THE AIR!!!

Valentine's Day Card


I made this cute card using Peppermint Creative digital elements and papers.
Also used a Silhouette cutting file for the envelope and matching insert.


I used the Candy Kisses Elements and Papers from Peppermint Creative

 
Candy Kisses Elements

&

Candy Kisses Papers


Used my Silhouette Cameo's "Print & Cut" feature to print and cut out all the pieces for my card and envelope with matching insert. 


Thanks for stopping by!!!
 

Sunday, January 19, 2014

Valentine's Day Treat Bag Tutorial

 
Painted vinyl stencil
Valentine’s Day Treat Bags
By: Tanya Alley
 
I painted up these adorable treat bags for Valentine’s Day. As promised I wrote up a quick tutorial to show you how I did it.
 
Photo 2
Supplies:Sweet Cheeks Elements
Linked Shaped Mats v.o1
Round Countdown Numbers
Silhouette Cameo Cutting Machine
Vinyl
Transfer Paper
Muslin Treat Bags
Weeding Tool
Scrapper tool (or old credit card)
Acrylic Paint
Sponge Brush
 
Here’s how I did it:
 
Step 1: Select your pattern, I used the digital elements from the digitial kits listed above to make my bags, But you can also create a design in Photoshop or other designing software and cut it out with your cutting machine . Weed the vinyl with your weed tool.
Photo 3
Step 2: Apply the transfer tape and use your scrapper tool to make sure that the transfer tape is down really good.
Photo 4
If you don’t have a scrapper tool, an old credit card will do the trick.
Photo 5
Step 3: Apply to your bag and carefully remove the transfer tape.
Photo 6
Step 4: Now dab your paint brush into the paint and apply to the bag.  Be careful not to put too much paint on at one time.
Photo 7
Step 5: Let it dry completely and then remove the vinyl.
Photo 8
There you have it!  Fill your bags with some small treats of your choice and dress it up with a little matching ribbon. Great for class treats or for a dinner party!
Give it a try –
 
Thanks for stopping by!!

Sunday, December 8, 2013

Christmas Floating Ornament

How to Make a Floating Ornament


Supplies Used:

Dear Santa Element pack
Candy Cane digital paper
Transparency sheets
White vinyl
Silhouette Cameo
Silhouette Studio Designer Edition
Two way glue pen
White glitter
Glass ornament
 
I used Studio Designer Edition and my Silhouette Cameo to make and cut my design, but you can use any photo editing software.


Making the Template

Step 1:


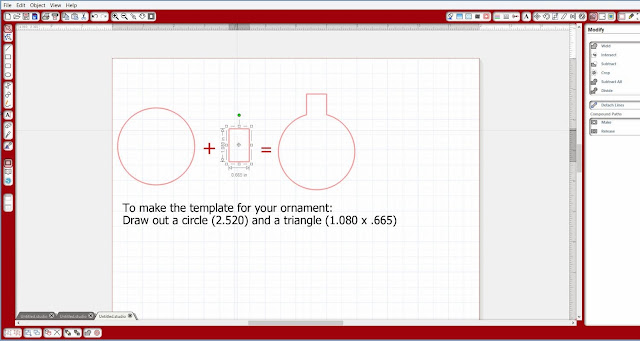
Draw a Circle and a triangle by using the drawing tools on the left side of the page.


Step 2:


The dimensions for your circle is 2.520 and the triangle is 1.080 x .665  You can put type the dimensions in by using opening the scale window on the right side of your screen.


Step 3:


Weld your two shapes together using the welding tool.   Now that you have your template made you can move on to the next steps.

Designing the Inside of the Ornament

 
For this ornament, I used digital kits from Peppermint Creative.  For this one I used
 
Candy Cane Christmas PapersDear Santa Elements 


Step 1:


For this ornament I used the Santa out of the Dear Santa element pack and paper from the Candy Cane digital paper.  To start, draw another circle the same size as your template and fill it with the Candy Cane graffiti green paper.  Once filled, go to your advance options. 
 

 Step 2:


To make it look even more dimensional, I changed the transparency of the paper.  After choosing the advanced options, find the transparency bar and slide it to 45%.
 

Step 3:

 
Now open the Dear Santa Element pack and select the Santa.  Resize it to fit into the circle and drag it over the top of the paper.

Printing the Ornament


One of the neat things about the Silhouette Cameo is that it has a "Print and Cut" feature.  To do this your have a couple of steps you need to follow.


Step 1:


The first thing to do is to pick the size of your paper.  My printer only prints up to a 8 1/2 x 11, so I choose the letter option.


Step 2:


To be able to cut after printing you have to turn the registration marks on.  


Step 3:


The transparency sheets are very expensive, so I made sure to fill the page before I hit the print button.

 
You can see here what the transparency looks like after printing.  I laid half of it on a white sheet so you can see the difference.
 

Cutting out the Ornament


If you aren't using a cutting machine, you can stop here and simply print your image and use a pair of scissors to do your cutting  (you don't have to have a cutting machine to make these ornaments).

Step 1:


Now you will choose the Cut Setting Options.  Here is where you will choose the speed, thickness and blade setting.   I chose a speed of 3, thickness of 33 and set the blade at 6.   Sometimes this is where you have to play around with the cut settings because materials differ in thickness and textures.  
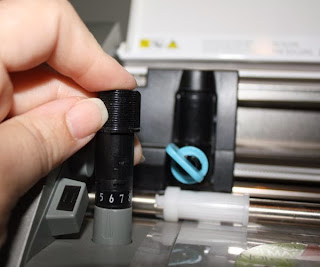
Make sure to manually change your blade setting.  I have changed it on the screen but forgot to change it manually and had to go back and cut it again.

Step 2: 

 
After printing you will put the sheet on your cutting mat.  Because the sheets are transparent you will have to put a small piece of paper behind the registration marks so that the machine can read them.  I got this tip from The Silhouette Challenge group.  I don't remember who suggested it, but it does work.  Thanks so much for the tip.


Here is what it looks like after it is cut.


Step 3:


You will cut an additional template out in white vinyl.  This is so that your image will show up.  Be sure to change your cut settings for vinyl.  Also manually change your blade.


Step 4:


Apply the vinyl cut out to the printed acetate sheet.  To do this, I laid the vinyl down with sticky side up.  I then started at one end matching it up and sticking it down.  You may have another way that works for you, but I have found this way to work best for me.

Embellishing


Step 1:


Use your glue pen on the beard, hat and cuff parts. 

Step 2:

Add the glitter. 
 
 
Tap off excess.


Assembling


Step 1:


Now just roll the insert up.


Step 2:


Take the top off the ornament, put the insert in and put top back on and your finished.
If you need to straighten your image up a bit after it unrolls, simply use a pair of tweezers.


There you have it!!  Isn't it cute?  The possibilities are endless. 
I made a bunch for Christmas gifts for Family and friends in Louisiana.  They were a hit!! 


Extra steps:

You can cut ribbon and add to the top of your ornament.  I was putting pieces of ribbon through the small hole at the top and it kept popping of the ornament.  I read on one of the Facebook groups to take a piece of floss and tie your ribbons to it and then thread through the hole at the top of the ornament.  I haven't tried it yet, but it sounds a heck of a lot easier. 

You can also cut vinyl and put on the front of the ornament to make it bit more personal.


Thanks for stopping by my crafting space!!


Hope everyone has a VERY MERRY CHRISTMAS!!