Showing posts with label cards. Show all posts

Monday, September 29, 2014

It's Been A While.......

 I've been MIA lately.  Without going into the details, life has been a little nuts lately.  Summer, family, work, etc. etc.   I know that is not a excuse, but that is what has been happening. 

One of the fun things I got to do lately was work with this fun digital scrapbook kit called Party Pants from Peppermint Creative.    I really love the fun colors in this set.  The balloons, the cake, presents....just so much fun party stuff.  


http://www.peppermintcreative.com/index.php?main_page=product_info&cPath=133_1&products_id=2830
 
Here are a couple of hybrid crafts that I made with this kit and my Silhouette Cameo.  The first one is one of my favorite cards.  It is made with the balloons and the Celebration word art.
 
 
I made a card base 4 x 5 and enlarged the balloons to where they were "off" the sides of the card.  I also printed an extra copy and cut around some of the balloons and layered them to add dimension.  I used black twine and tied it around a few of the balloons.
 
Here is another card using the birthday cake.
 
 
One of my favorite things to do with my Cameo is Print and Cuts. 
For this print and cut, I cut out several extra pieces and adhered to the base of the card with pop dots
 to give dimension. 
 
And last but not least, is a cute little box that I made with the paper from the Party Pants kit.
 
 
Hope that these hybrid projects inspire you to take out your favorite digital kit and make something fun. 
 
Have a GREAT week!
♥, Tanya
 

Sunday, September 1, 2013

And the winner for The Cutting Cafe' Blog Hop is.....

Time to announce the winner to The Cutting Cafe' Blog Hop. 


The Cutting Cafe

But before I announce the winner, I want to THANK everyone that left a comment and participated in the blog hop.   It was ALOT of fun.  I want to also say "THANKS" to Regina for having me on her awesome design team!  I'm very sad to be done with my term, but look forward to all the NEW design team's projects. 

And the winner of the pumpkin trio set is...........

I love this card! Fall is my favorite time of the year and I can't wait to make this as a table
card. I love your paper colors and the polka dots just add that touch! This is so cute!!!

Congrats Angie...it's just in time for Fall!!  Please contact me so that I can get you your prize. 

Monday, July 22, 2013

What girl doesn't love pretty nails and cute toes......

Summer time is the perfect time for flip flops!!!  Every girl can't wait to get a pair of cute flip flops on.  That means you have to have cute toes and of course nails to match.   I have never had a girls night out...I know, but it is true. (Yes, I live a pretty boring life)  My idea of a girls night out would be movies, munchies, facials and of course manicures and pedicures.  That sounds fun to me!   I think it's time to have a spa day!

Regina at The Cutting Cafe' made the  perfect set for this "girlie" occasion.  It would be such a cute idea for a girls party.  I know if I had a little girl, we would definitely have a spa day.  What about for the bride and her wedding party? 


This NAIL POLISH SHAPED CARD INVITE - template and cutting file set features the following:
1 shaped card - approx 5 by 2.5 inches (using the outline shadow)
Envelope template
4 assorted invite sheets (they also come several on a page for mass printing)
18 sentiments - 9 are mini words
The set comes in the following formats: PDF, WPC, MTC and SVG
 
 
Supplies:
Black Card Stock
White Card Stock
White Ribbon
Turquoise Paint Chip - (I love recycling things!)
A Round Array stamp set - Stampin' Up!
 
Used my Silhouette Cameo with Silhouette Studio Edition
 
2013-06-27_205118
These are some of the sentiments in this set
 
To check out other team member's projects, stop by The Cutting Cafe's Blog on Wednesday.  Don't forget to leave a comment to win free sets from The Cutting CafĂ© store!
 
Thanks for stopping by!!

Thursday, June 13, 2013

Silhouette Welding Tutorial

Hello everyone!  I hope that everyone is having a great day.  It's one day closer to Friday and that makes me happy.

I made this card for my Godchild to congratulate him on a job well done in school.  My husband said "You made it, but you probably won't get it to him until school starts again."  He knows me well.  My intentions are good.  Anyway, I proved him wrong!  I made it and mailed it along with my niece's card the next day!!  Wooohooo.....there is a first for everything and that was definitely a first.

Some of my silhouette/facebook group friends ask me how I made the card.  I'm pretty new to writing tutorials, so I hope I didn't miss anything.  I've written a few for Peppermint Creative (you can see them here and here).  The more you write, the better you get....so here it goes!!


You Rock!!!


First I opened a star that I bought at the Silhouette online store.  I'm sure there are plenty of free, but I needed this one pretty quick.  I used it to make this project for my friend, It was her Dad's 70th birthday.  It was also my first project. 


Next thing you will do is open this image on a new page. You can probably do it all on the same page and move images that you aren't currently using off to the side.  However, I like to open a new page. 
 
This is what it looks like (above) when you open it.
This was a free image I got here. 


Next step is to pick Select Trace area (top red arrow).  You will drag the square to cover the entire image until it is all highlighted.  Once that is done, you will UN check (sure there is better terminology)  the High Pass Filter (second red arrow).  After un checking the high pass filter, go to the threshold and slide it all the way to the right or until the entire image highlighted yellow.


 After highlighting it all you will select the trace outer edge option.  You can see the red lines around the image.  It should look like the image above. 


After selecting the trace outer edge option, you will drag them apart. At this time you can move the original image off to the side if you like the looks of it (the texture) or delete it.  I deleted the image because I wanted the solid look.


You should end up with an image that looks like this.  Next step is to fill in the color.


Next, make sure that your image is selected.  I have tried doing new steps without making sure the image is select and nothing happens.....of course....then it clicks....I forgot to select it...UGH!  Okay so now it's time to select the paint bucket at the top of your screen.  Once you hit the bucket tool, color options will appear on the right.  Pick black, it will fill your image with the color selected. 


Now you do a copy and paste of the image.  You will have two images on your screen.


The next step is to make sure one image is outlined and one is not.  To do this you will select the scissor tool at the top of the page.  This will pop up the cut menu.  It will show that both images have cut lines, you will want to turn the cut lines to one of them off.  Highlight one of them and then select the NO CUT button.  This should remove the red lines. 

 
 Following so far? 
I know it's a lot of info and some of it very basic, but I trying to think about the ladies that  have never done these steps before. (and/or need step by step instructions like I do!) 
Okay, so let's continue...this was the confusing part for me. 


Okay, here is where it gets tricky.....
We need to bring both images to the same page.  So just copy and cut the image of your star and paste it to the page where the "hand" images are.
 
1. Move the "no cut" image off to the side.  You will be using at the end so you can just leave it off to the side for now. 
2. You will now highlight the whole hand/guitar image. 
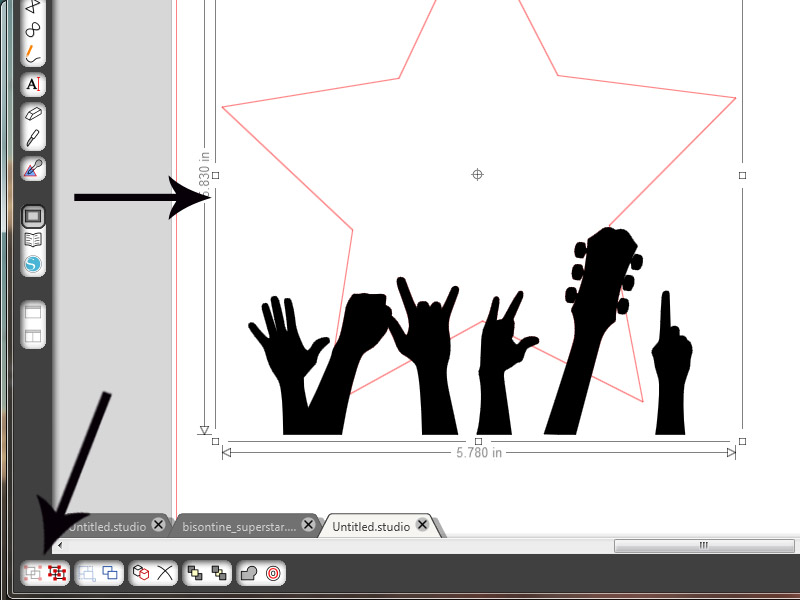
3. Once it's highlighted you need to RELEASE compound path under the modify menu


Now you are going to slide the bottom image up to the star and place it where it looks nice to you.
Highlight the whole image.


Next you need to click on Modify button at the top menu bar.  It will pop up options on the side.  Now hit the subtract button under the modify window.   After clicking on the subtract button, it will look like the picture above.   The pictures are joined and the red are where it is going to cut. 


Now select the whole image (star) and group it together.  The group button is all the way on the bottom left.  This makes it all one piece instead individual pieces and you are able to move it around.
 
 
 Next take the image that was over on the side of your page and line it up with the top image (star) Remember to make sure the cut lines are off on the image you are dragging back up the where they were welded together.


Now that you have it all lined up.  You will select the whole image together and Group them together.  


This would be a good time to check your cut lines to make sure it is done right.  It should look like this image.
 
 
Now after you have accomplished ALL of these steps, you are ready to make the rest of the card.  I used a card base from the Silhouette Store.  The digital paper is from Peppermint Creative. It's listed below.  It's one of my favorite paper packs.  Actually, I have several favorites.
 
Houndstooth Heaven Papers
 
Now you have everything you need to make this card.  I hope that the steps are all there and that you can understand my instructions.  Please feel free to ask me any questions.  I know there may be an easier way to do this.  I discovered a few while making this tutorial. 
 
 
Have a great Day!!!
Tanya


Tuesday, May 21, 2013

Keep Calm and........

Today's post is not been easy to do.  I know I try to say possitive on my post, but I'm having trouble staying focused.  For the last couple of days we have been having some really bad tornados, One being listed as the largest ever.  My family is safe, but we know several that have lost homes. And I just can't stop thinking of the children that have been lost and trapped inside the school.  So If you have time, just say alittle prayer for families that have lost homes and or relatives in this horrific storm.

I love all the Keep Calm sayings that are going around.  Of course one of my favorite is Keep Calm and craft on.  I could do that all day if I had the time.  But for todays post I decided to do one that says Keep Calm and shoot for the stars.  I have to brag on my niece, Caleigh. She inspired me for this one.  She just received 11 awards and 3 trophies in school.  I  think she is shooting for those stars.  I am sooooo very proud of her.  She is a very sweet, smart, beautiful, talented little girl and I love her soooo much along with her mom, dad (my brother) and my handsome, sweet, smart, talented Godchild (her brother), Blaise!!

So for my card I used:

KEEP CALM AND REACH FOR THE STARS PRINTABLE SET

*Sneak Peek*
*Sneak Peek*
 This KEEP CALM AND REACH FOR THE STARS printable set features 10 different images in both black and white and color.
The images are approx.
 2.5 by 3 inches.
The set also comes with a matching envelope.
The envelope template comes in SVG, MTC, PDF and WPC format.
The Printables come PDF and JPEG format.
KEEP CALM


Hope you enjoy the card. 
Don't forget to stop by The Cutting Cafe! 
Leave a comment to win FREE sets from the store!

Happy Crafting!!!


Wednesday, April 3, 2013

April showers bring May flowers..........

......I sure hope so.  I am so ready for spring weather and to see green and colors.  Everything around here is dead.  It's kinda depressing.  We did get some well needed rain today and it suppose to rain for two more days.  This will make the farmers very happy.

Okay so on to the fun stuff.  I have just finished the project for this weeks challenge.  Mrs. Regina at The Cutting Cafe' has been adding to the collection a couple of times a week.  So if you haven't stopped by lately, you really need to stop by.  This week we got to choose from one of the following sets:
 
TALL PRESENT SHAPED CARD TEMPLATE - CUTTING FILE 
TALL FLOWERS SHAPED CARD SET...TEMPLATES - CUTTING FILE 
TALL CAKE SHAPED CARD TEMPLATE - CUTTING FILE 
TALL ICE CREAM SHAPED CARD TEMPLATE - CUTTING FILE
 
All the files above will fit nicely in the STRING AND BUTTON ENVELOPE.
 

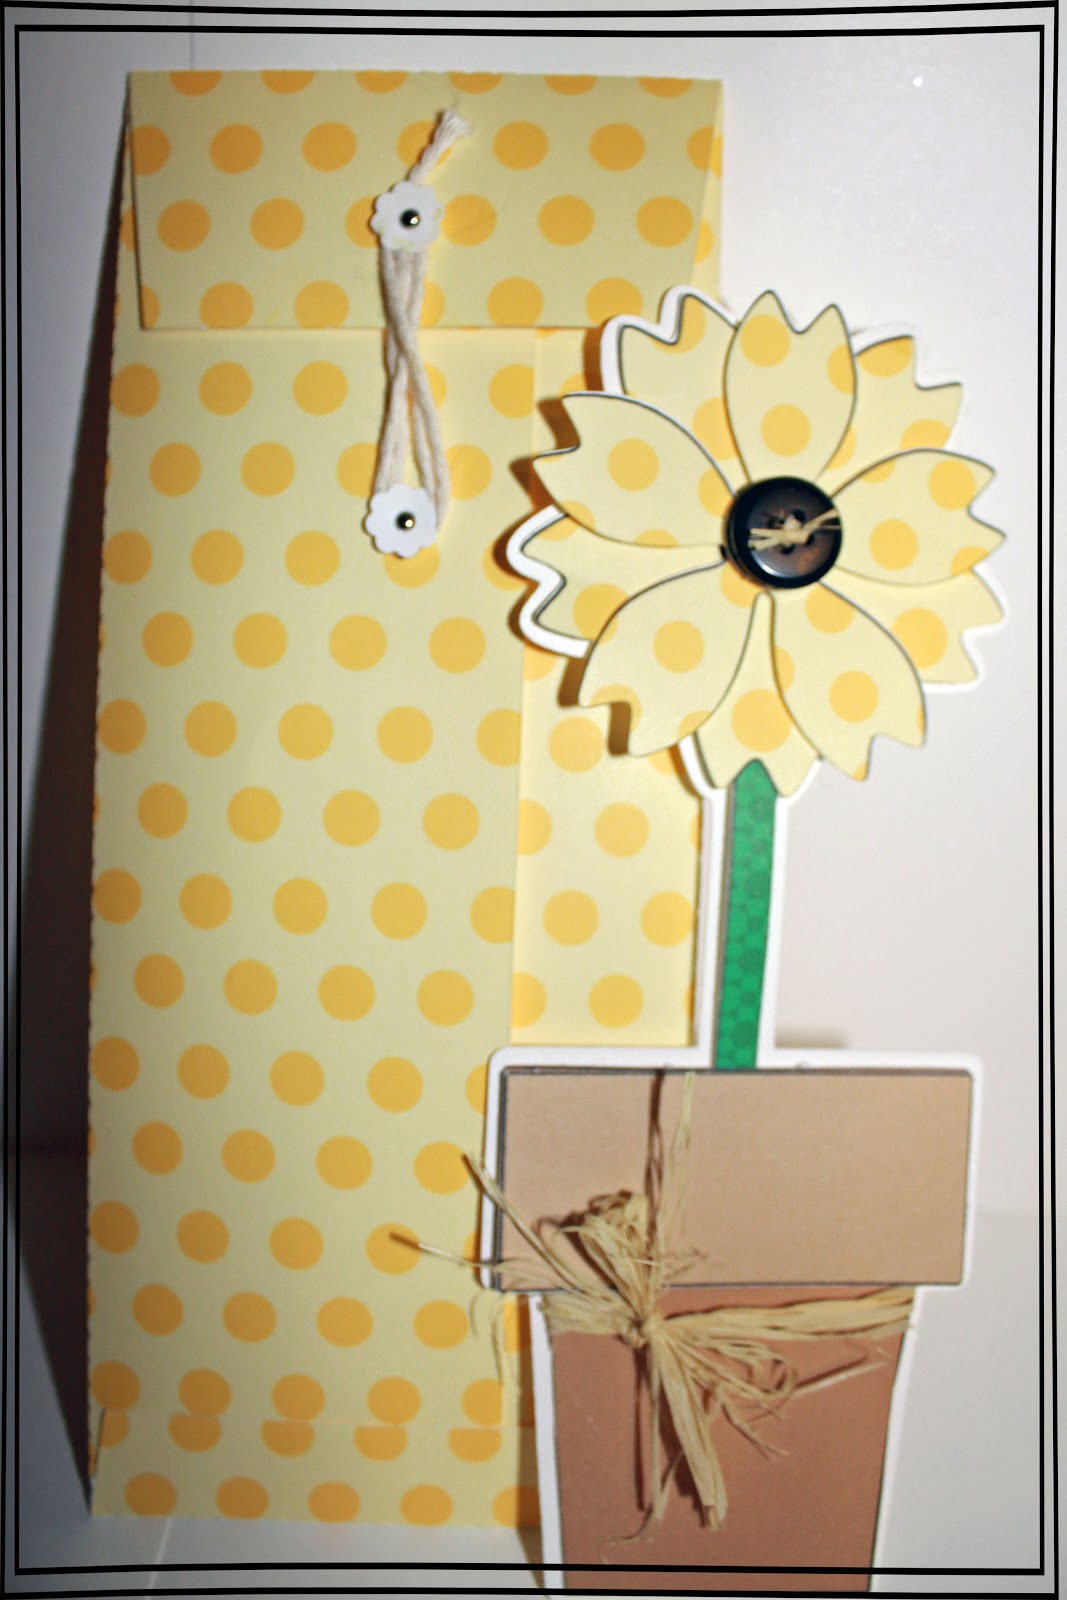
I chose the Tall flower shaped card set.  Hope you enjoy it.

 
I used my Silhouette Cameo and imported the files into SS.  From there I did a print and cut.  Very easy to assemble!!!  Also the smaller picture above is a punched flower and a brad.  There are many ways that you can do this. Mrs. Regina has a quick tutorial here on how to do the envelope.
 
 Hope everyone has a great day tomorrow.  It's a new day and new beginnings. 
Stop by The Cutting cafe's Blog tomorrow to see all the other fun projects the design team has made.


Tuesday, March 26, 2013

Oh Snap!..........

This weeks project for The Cutting Cafe is the POLAROID AND CAMERA FUN TEMPLATE AND PRINTABLE SET.   

This set includes:
1 Polaroid frame shaped card - approx. 3.5 by 4 inches. (also comes with a matching envelope), 1 smaller polaroid frame - approx. a little bigger then 1.5 by 2 inches.
Left and right speech bubble,1 arrow, 1 film strip, 1 polaroid camera with all the accessories to decorate it - approx. 2.5 by 2 inches, 1 camera with all the accessories to decorate it - approx. a little bigger then 2.5 by 1.5 inches, 1 polaroid camera shaped card - approx.5 by 4 inches. 1 camera shaped card - approx. 5.5 by 4 inches.  All of the cutting files come in the following formats: WPC, PDF, SVG AND MTC.
PLUS the set includes 55 other assorted printable images.

2013-03-14_171849

I wasn't quite sure what I was going to do with this set.  I really love my camera strap, so I thought I would incorporate a cute "strap" to the card.

 
Imported into Silhouette Studio.  I used the print and cut feature.   Check out some really good silhouette tutorials here.  Added a small punched flower with brad from Stampin' UP!
 
Camera Strap detail below 
 
Hope you enjoy the card. 
 
Thanks for Stopping by and don't forget to stop by The Cutting Cafe!  Regina has some really cute new files including this one!


Sunday, March 17, 2013

An Apple a day...........

An apple a day keeps the doctors away, or so they say.   I don't know if this actually works, because I haven't done it.  Maybe I should test this well known rhyme.  It would be alot healthier than all the junk I like.  Is it too late for another New Year's Resolution?

This week at The Cutting Cafe the design team were given the choice of using Birthday Fun, Fun With Dress Forms or the Apple Box set.  I chose the Apple Box set.  To celebrate the Holiday, "St. Patricks Day" the project was done in green colors. 
APPKLE SEMTI,EMTS
 (Sentiments in the set)
 
 
For this project I used digital paper that I got free at kevinandamanda.com.  I also used craft cardstock that I purchased at Hobby Lobby.  To cut out the apple, I used the print and cut feature on my handy dandy Silhoutte Cameo.  Did I ever tell you how much I love this machine?  For the light green square I used the color picker in the Silhouette Studio program. 


Tuesday, February 5, 2013

Spring Showers Bring May Flowers.....

We are having spring like weather today.  It's beautiful, but enjoy it while it's here, because it will change. The weather here has been so confusing.  One day freezing "coat" weather, the next day warm "flip flop" weather.  It's no wonder everyone is sick with something.  Showers sound wonderful.   We have been going through a three year drought here in Oklahoma so we desperatley need the rain!!!!!!!!!

This set from The Cutting Cafe' brings lots of hope of what's to come.....SPRING!!!  One Spring Day printable stamp set has 90 plus images.  Some are black and white and some are in color. 

Here is a sneek of the One Spring Day~Printable Stamp set

One spring day 2


For this card I used my Silhouette (again).  I colored everything in Silhouette Studio and used the print and cut feature.  I backed the card with black cardstock and added a black bow.  For the striped background I used a digital paper you can find here.  I layered the flowers to see some of the outline. 


Monday, January 7, 2013

Driving by........

I have had sooooo much fun doing these projects.  Today, however, has been a day of challenges.  I've had computer trouble, blog trouble (which explains the way you are veiwing everything) printer problems and Silhouette Studio has given me fits.  To top it off, I got ink on one of my FINISHED projects and had to redo it.  

Anyway, I am happy to tell you, after ALL of that, I am ready to unveil......... 

Finished project! I used the cute car from the Feb 14 printable set at The Cutting Cafe!
This set has 82 images!  It has been so fun working with this set, Thanks Regina
 
Just a close up to show the 3d details

Card Details:
I used Silhouette Studio to import some digital paper (sorry, I can't remember where it came from) Then I printed it on my printer and cute it out with the silhouette cameo.  Oh, I designed the rest of the topper in Photoshop.

The next two projects are also from the same set. 

I used one of the circle cards from the Silhouette Store and the circle stamp from the Feb 14 set.
 
This is a little memory album I picked up at the Dollar Store.
I used one of the printable stamps and the heart stamp from the same set.  The tag is from the Silouette store.   I added cute little button brads that I got from Stampin UP.


Don't forget to stop by The Cutting Cafe. 
Thanks for stopping by!